
 Demo
Demo"Show and Hide" effects are the most commonly used effects used in the Javascript library. They are easy to learn and implement but yet visually impressive enough to catch some attention.
To show or hide contents completely is easy. But what about showing a partially-extended list?
I found a excellent tutorial from Chris Pollack which details how to do it: Sliding content from a partial height with jQuery.
So what i'm gonna do today is to simplify his code and to explain in details how it work.
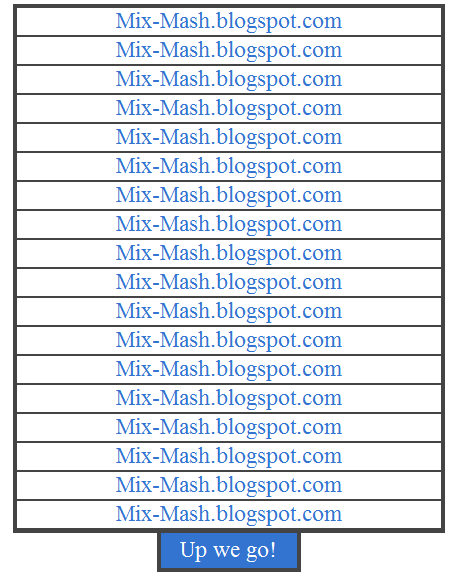
Let's create a simple list. Preferably make the list long so that you can see the sliding effect better.
HTML<div id="slide">
<ul>
<li><a href="http://mix-mash.blogspot.com">Mix-Mash.blogspot.com</a></li>
<li><a href="http://mix-mash.blogspot.com">Mix-Mash.blogspot.com</a></li>
<li><a href="http://mix-mash.blogspot.com">Mix-Mash.blogspot.com</a></li>
<li><a href="http://mix-mash.blogspot.com">Mix-Mash.blogspot.com</a></li>
<li><a href="http://mix-mash.blogspot.com">Mix-Mash.blogspot.com</a></li>
<li><a href="http://mix-mash.blogspot.com">Mix-Mash.blogspot.com</a></li>
<li><a href="http://mix-mash.blogspot.com">Mix-Mash.blogspot.com</a></li>
<li><a href="http://mix-mash.blogspot.com">Mix-Mash.blogspot.com</a></li>
<li><a href="http://mix-mash.blogspot.com">Mix-Mash.blogspot.com</a></li>
<li><a href="http://mix-mash.blogspot.com">Mix-Mash.blogspot.com</a></li>
<li><a href="http://mix-mash.blogspot.com">Mix-Mash.blogspot.com</a></li>
<li><a href="http://mix-mash.blogspot.com">Mix-Mash.blogspot.com</a></li>
<li><a href="http://mix-mash.blogspot.com">Mix-Mash.blogspot.com</a></li>
<li><a href="http://mix-mash.blogspot.com">Mix-Mash.blogspot.com</a></li>
<li><a href="http://mix-mash.blogspot.com">Mix-Mash.blogspot.com</a></li>
<li><a href="http://mix-mash.blogspot.com">Mix-Mash.blogspot.com</a></li>
<li><a href="http://mix-mash.blogspot.com">Mix-Mash.blogspot.com</a></li>
<li><a href="http://mix-mash.blogspot.com">Mix-Mash.blogspot.com</a></li>
</ul>
</div>
This should be what you will get:

CSS<style type="text/css">
#slide{
overflow:hidden;
width:300px;
margin:0 auto;
text-align:center;
}
#slide ul{
list-style:none;
border:3px #444 solid;
border-bottom:none;
margin:0px;
padding:0px;
}
#slide ul li a {
color:#3274d0;
display:block;
border-bottom:2px #444 solid;
text-decoration:none;
}
#slide ul li a:hover{
color:#fff;
background:#3274d0;
}
.bottom{
width:300px;
margin:0 auto;
border-top:3px #444 solid;
text-align:center;
}
.tabs {
width:100px;
margin:0 auto;
}
.tabs a{
background:#3274d0;
color:#fff;
padding:3px;
text-decoration:none;
border:3px #444 solid;
border-top:none;
display:block;
}
</style>
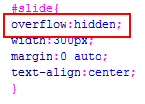
You will get this:
Honestly 99% of my CSS is just to beautify the list.
The most important line in the style-sheet would be the "overflow" property. "hidden" would allow it the list to be cut to it's required length.
Ok! enough with mundane stuff. Let's get sliding!
Javascript<script type="text/javascript">
var sliderHeight = "100px";
var cHeight;
$(document).ready(function(){
cHeight = $('#slide').height();
$("#slide").css("height",sliderHeight);
$(".tabs").html('<a href="#">Pull</a>');
$('.tabs a').click(function(){
  openSlider()
  })
});<!-- end document ready -->
function openSlider(){
$('#slide').animate({height:cHeight+"px"},"slow");
$(".tabs").html('<a href="#">Up we go!</a>');
$('.tabs a').click(function(){
  closeSlider()
  })
}<!-- end open slider -->
function closeSlider(){
$('#slide').animate({height:sliderHeight},"slow");
$(".tabs").html('<a href="#">Pull!</a>');
$('.tabs a').click(function(){
openSlider();
});
}<!-- end closeSlider -->
</script>
Javascript explained - Variable sliderHeight is to state your list's height when it is partially hidden. cHeight is to record the list's true height.
Basically, JS will record your list height first.
var sliderHeight = "100px";
var cHeight;
Then when "a" inside of class ".tabs" is been clicked, function openSlider() will be called.
$('.tabs a').click(function(){
openSlider()
})
Inside openSlider() function, animation method is used to reveal the true height,cHeight.
$('#slide').animate({height:cHeight+"px"},"slow")
If ".tabs a" is been clicked again, closeSlider() function will be called instead. The list will then slide back to it's hidden height.
$('.tabs a').click(function(){
closeSlider()
})
